
Hi there, wow November already and everyone seems to be busy crafting for Christmas. It was great to see so many entries last month - I know you are all ever so busy at this time of year.
So we move onto another brand new challenge here on Beading Friends Forever. Thankyou ever so much to our fabulous sponsor, Beads Direct for their wonderful prize of £15 to spend at their website.
The challenge follows the usual format of a tutorial and a theme. You are allowed to enter each part 3 times making a total of 6 entries. Remember the more times you enter the greater your chance of winning. The winner each month is chosen by random.org so it does not matter if you are a beginner or more advanced. Please take a moment to read the rules on the sidebar.
*****
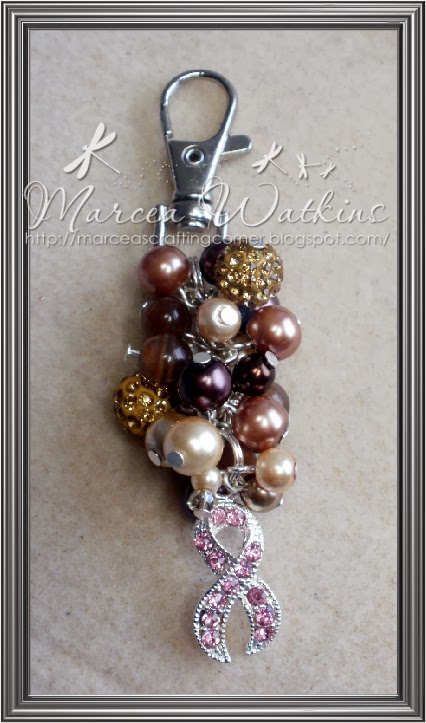
Theme - A Bag Charm
DT Inspiration


*****
Tutorial - Jeweled Bracelet
A huge thankyou to Around the Beading Table for allowing us to use their tutorial this month. Visit their website for lots more inspiration

The tutorial is different this month because it is a pattern instead of a video. It is a very clear pattern with lots of pictures but if you have any questions please ask on the BFF facebook page and I will do my best to answer them.
The link to the tutorial is http://www.aroundthebeadingtable.com/Tutorials/LindasJeweled.html
(pattern below DT inspiration)
DT Inspiration


LINDA'S TWEAKED JEWELED BRACELET

Materials (for a 7.5 inch bracelet):
- 4 yards FireLine
- About 100 size 11/0 seed beads
- About 72 size 4mm bicone crystals
- About 9 size 6mm fire-polished beads
- clasp

code = seed bead, bicone crystal and fire polished bead
Step 1: Thread your needle with 4 yards of Fireline (or start with a length that you are comfortable with and add more later).
Step 1: Thread your needle with 4 yards of Fireline (or start with a length that you are comfortable with and add more later).
String two seed beads, a fire-polished bead, two seed beads, a bicone crystal, a seed bead and a bicone crystal.
Leaving about a 12-inch tail for attaching the clasp, tie the beads in a circle with a double knot:

Step 2: Go back around through the two seed beads and the fire-polished bead that you strung in the last step:

Step 3: String two seed beads, a bicone crystal, a seed bead, a bicone crystal and two seed beads.
Go around and back across through the fire-polished bead:

Step 4: Go back up and around through the two seed beads, the bicone crystal, the seed bead, the bicone crystal and the seed bead highlighted in RED:

Step 5: String a bicone crystal, a seed bead and a bicone crystal.
Go back across through the seed bead, the bicone crystal, the seed bead, the bicone crystal and the seed bead (all beads highlighted in RED):

Step 6: String a bicone crystal, a seed bead and a bicone crystal.
Go back across through the seed bead, the bicone crystal, the seed bead, the bicone crystal, the seed bead, the bicone crystal and the seed bead highlighted in RED:

Step 7: String a bicone crystal, a seed bead, a bicone crystal, a seed bead, a bicone crystal, two seed beads, a fire-polished bead and a seed bead:

Step 8: Circle back around...

and go down through the seed bead, the bicone crystal and the seed bead highlighted in RED):

Step 9: Continue back around through the bicone crystal the two seed beads and the fire-polished bead highlighted in RED:

Step 10: String two seed beads, a bicone crystal, a seed bead, a bicone crystal and two seed beads. Go around and back across through the fire-polished bead:

Step 11: Go back down and around through the two seed beads, the bicone crystal, the seed bead, the bicone crystal and the seed bead highlighted in RED:

Step 12: String a bicone crystal, a seed bead and a bicone crystal. Go around and back across through the seed bead, the bicone crystal, the seed bead, the bicone crystal and the seed bead highlighted in RED:

Step 13: String a bicone crystal. Go back around through the seed bead, the bicone crystal, the seed bead, the bicone crystal, the seed bead, the bicone crystal, the seed bead, the bicone crystal and the seed bead highlighted in RED:

Step 14: Go back around through the beads highlighted in RED to give the motif some extra strength:

Step 15: Flip the bracelet over so that you are exiting from the bottom of the right-most seed bead:

Step 16: Repeat Step 7 to Step 15 until your bracelet is the length you want it, minus about a half-inch and the length of your clasp.
Step 17: To attach one side of your clasp, make a loop of seed beads that will circle round through your clasp: String two seed beads, go through your clasp, string two more seed beads and go back down through the seed bead that you exited at the beginning of this step:

Go back around through these seed beads and the clasp several times. Weave back through the bracelet, going around through the outside of each motif to strengthen and tighten up the beads. Knot in several places and cut your thread. Use the tail thread from Step 1 to attach the other side of the clasp.
Many thanks, Linda!
*****
I really hope you all join in and are not put off by not having a video tutorial. This is a stunning bracelet and it would look gorgeous with so many different types of beads.
*****
So there you have it. Happy beading! You can enter either on the linky below or by sharing your entry on our Facebook group - Beading Friends Forever. Make sure you add your entry to the challenge page for November.
Entries to be submitted by 6pm on November 30th.
One winner will be selected using random.org
Happy beading - love Marcea and the BFF Design Team
xxx


0 comments:
Post a Comment